Photos and info © 2010Curly Girl Design, Inc./Leigh Standley. all rights reserved.
Oh man did this day get away from me! Ah well…the beat goes on…
Awhile back while we were putting together the new showroom my friend Lizzy was helping me with the initial vision for the space given our small budget and small timeline. Usually, between the two of us and a shoestring we can come up with something pretty fun, so after spending the better part of a day (we may have gotten carried away) in the fabric store picking out all sorts of different wacky colors and fabrics to make pillows for the seating area, we wanted to bring that collage-y feel into the rest of the space. Naturally, we spent the other part of the day in IKEA (that’s Swedish for budget-friendly heaven) waiting for inspiration to strike.
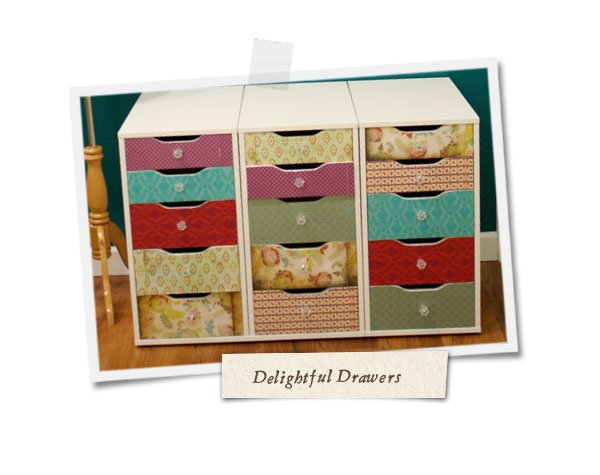
We needed storage, but it needed to be cute. We found lots of storage, but not a lot of cute. So we decided to make it cute. The result was this delightful set of drawers that ended up being so fun, we took them out of the office and used them as furniture! They take a bit of time, but not much else and the possibilities are endless!
You will need:
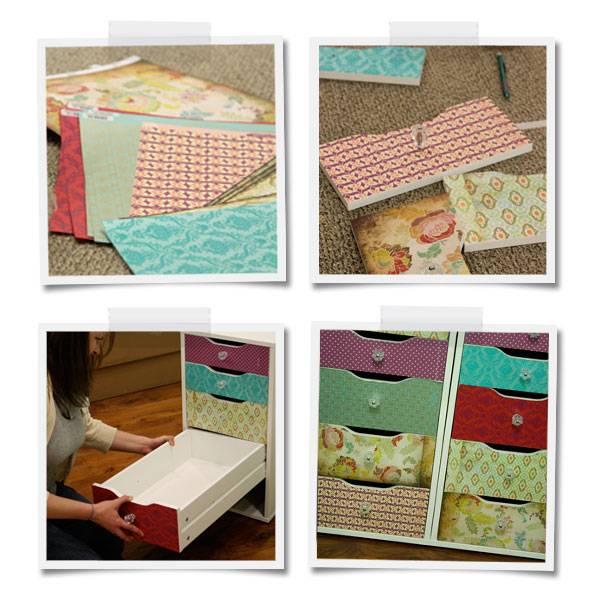
1.) Loose craft paper. I ended up using what I could find at Paper Source in a hurry, but this would be really cute with maps, wallpaper, ephemera or even wrapping paper! If you are using scrapbook paper, you will need two sheets per drawer, and some masking or painters tape.
2.) Super 77 Spray Mount. I like this one because it is serious business. It goes on light, and stays put.
3.) Mod Podge. An old friend. I did not use this on the ones pictures, but would recommend a coat to keep the paper from getting too worn.
4.) Scissors
5.) Cute knobs. I used cheap crystal ones from Home Depot, but any drawer pulls will work.
6.)The ALEX or VIKA ALEX drawer unit from IKEA
7.) A drill.
8 & 9.) not pictured: a pencil, brush for the Mod Podge and a ruler.

Instructions:
The first thing you want to do is get your paper figured out. Decide which paper is going on which drawer and lay them out. If you are using scrapbook paper, or pieces, match them up how you want them to look and tape the seams with masking or painters tape (on the front). Set aside.
Open the package of the drawer unit (make sure all of the pieces are there first! so annoying if they are not) and pull out the drawer front pieces.
Match one set of paper up with one drawer front. Take the paper you want to use and turn it over, trace the drawer on the back with a pencil and cut it out. It is important to be very precise in your cutting because you want the fit to be exact.
Lightly spray both the drawer front (make sure you are spraying the right side) and the back of the paper you just cut. Carefully lay the paper on the drawer front so that it matches up. Smooth from the center out. If you have taped the papers together on the front, carefully remove the tape at this time. Repeat this process for all of the drawer fronts.
For protection, brush a light coat of Mod Podge Matte over each drawer front, paying special attention to the edges and watching for bubbles. Let dry.
Assemble the piece of furniture according to the directions. Do not permanently install the drawers on the rails yet.
After your drawers are fully assembled, grab your drill, ruler and pencil. find the middle of the drawer and about an inch down. Drill a hole that will suit whatever drawer pull you have chosen. Attach the pulls as directed.
Install your drawers on their rails and Voila!! You have a unique and totally functional piece of DIY delight!
Have fun!
xoxo
